Home
/ Front Logo Placement On Shirt - Logo Placement Guide, In the slides after the titleslide i want to have the logo in the top right corner.
Front Logo Placement On Shirt - Logo Placement Guide, In the slides after the titleslide i want to have the logo in the top right corner.
Front Logo Placement On Shirt - Logo Placement Guide, In the slides after the titleslide i want to have the logo in the top right corner.. Except that there is no buttons or placket to be able to determine how far down the logo should go. The easiest and fastest way to find the center of a shirt is to fold the shirt lengthwise lining up the shoulder seams at the neck. Once the shirt is put on, there will be less area on the front of the shirt with part of it wrapping around to the person's side. Below is a helpful guide that takes the eyeballing out of design placement. In the slides after the titleslide i want to have the logo in the top right corner.
Except that there is no buttons or placket to be able to determine how far down the logo should go. This is where some mistakes are made. Instead of placing the logo in the same position throughout the slides, i want to place the logo in the middle or a bit up from the middle in the title slide. Aug 20, 2018 · find the center of a shirt for decal placement the first thing i do is find the exact center of the shirt. Sep 29, 2016 · in doubt on your placement, err on the side of centering the graphic toward the buttons.
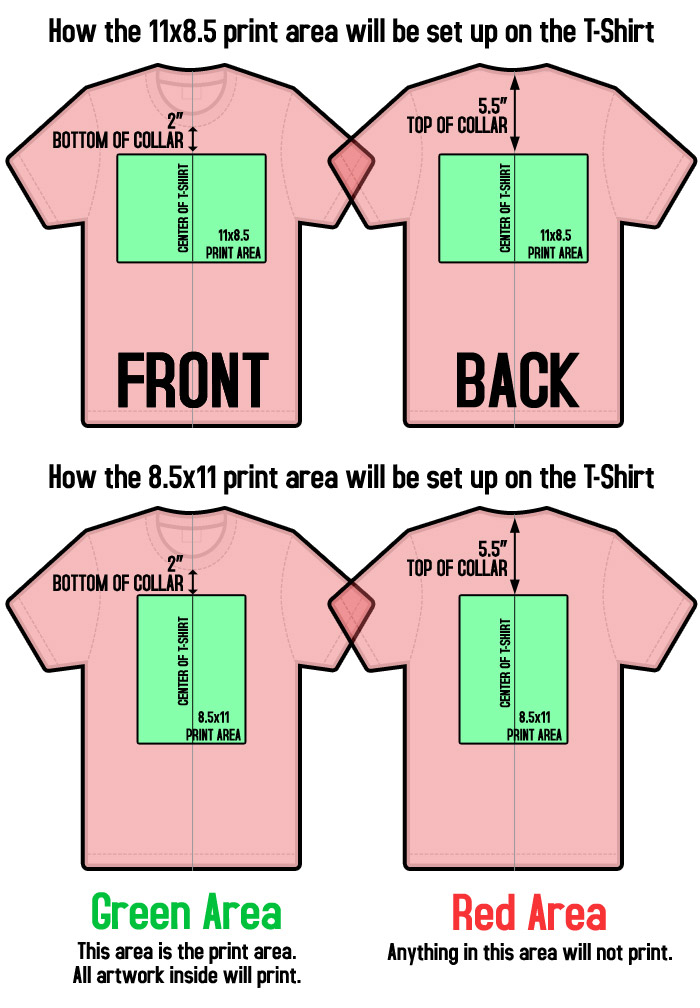
Logo Placement Guide from lh3.googleusercontent.com *a shipment may be delayed (i) if there is an issue with your order such as a need for additional payment verification which causes a processing delay; Oct 26, 2017 · not too high, not too low, not too far left or right, and placement of dreaded chest prints. Be careful not to let the logo get too far to the left (as if wearing the shirt) as it may end up in the armpit area. The standard print size for full front is 12"w x 14"h. This placement is most often used for a logo and can be combined with a full front design, center chest design, or a left chest + sleeve combination. Except that there is no buttons or placket to be able to determine how far down the logo should go. I found the placement of logo in the slide is not that easy. For example if the logo for a size small men's polo is 3.5 from the center point, the logo will
The easiest and fastest way to find the center of a shirt is to fold the shirt lengthwise lining up the shoulder seams at the neck.
Be careful not to let the logo get too far to the left (as if wearing the shirt) as it may end up in the armpit area. Be sure the bottom hem is aligned too. Instead of placing the logo in the same position throughout the slides, i want to place the logo in the middle or a bit up from the middle in the title slide. (ii) if the order was placed between thanksgiving and the following tuesday (the vast majority of these orders will ship on the same business day if placed by 3 pm et but there is a chance it. The standard print size for full front is 12"w x 14"h. Below is a helpful guide that takes the eyeballing out of design placement. In the slides after the titleslide i want to have the logo in the top right corner. This placement is most often used for a logo and can be combined with a full front design, center chest design, or a left chest + sleeve combination. If the print is placed too close under the arm while on the press, once the shirt is put on, it becomes an armpit print instead of a left chest! There is not a standard size for a tag print and will be sized based on the design and how it relates to the shirt. I found the placement of logo in the slide is not that easy. Sep 29, 2016 · in doubt on your placement, err on the side of centering the graphic toward the buttons. For some designs, this size can look very large, and you can end up with a lot of ink on the shirt, which can result in a heavy print that isn't breathable, also known as a "sweat patch", for obvious reasons.
This placement is most often used for a logo and can be combined with a full front design, center chest design, or a left chest + sleeve combination. For some designs, this size can look very large, and you can end up with a lot of ink on the shirt, which can result in a heavy print that isn't breathable, also known as a "sweat patch", for obvious reasons. (ii) if the order was placed between thanksgiving and the following tuesday (the vast majority of these orders will ship on the same business day if placed by 3 pm et but there is a chance it. The easiest and fastest way to find the center of a shirt is to fold the shirt lengthwise lining up the shoulder seams at the neck. Aug 20, 2018 · find the center of a shirt for decal placement the first thing i do is find the exact center of the shirt.
Tips for Heat Transfer Vinyl Shirt Decal Placement ... from 1.bp.blogspot.com Be sure the bottom hem is aligned too. Except that there is no buttons or placket to be able to determine how far down the logo should go. Oct 26, 2017 · not too high, not too low, not too far left or right, and placement of dreaded chest prints. Adjust your placement by approximately ½ for each size up from your smallest shirt. Below is a helpful guide that takes the eyeballing out of design placement. *a shipment may be delayed (i) if there is an issue with your order such as a need for additional payment verification which causes a processing delay; This placement is most often used for a logo and can be combined with a full front design, center chest design, or a left chest + sleeve combination. Instead of placing the logo in the same position throughout the slides, i want to place the logo in the middle or a bit up from the middle in the title slide.
If the print is placed too close under the arm while on the press, once the shirt is put on, it becomes an armpit print instead of a left chest!
Aug 20, 2018 · find the center of a shirt for decal placement the first thing i do is find the exact center of the shirt. (ii) if the order was placed between thanksgiving and the following tuesday (the vast majority of these orders will ship on the same business day if placed by 3 pm et but there is a chance it. *a shipment may be delayed (i) if there is an issue with your order such as a need for additional payment verification which causes a processing delay; Adjust your placement by approximately ½ for each size up from your smallest shirt. Instead of placing the logo in the same position throughout the slides, i want to place the logo in the middle or a bit up from the middle in the title slide. Except that there is no buttons or placket to be able to determine how far down the logo should go. Oct 26, 2017 · not too high, not too low, not too far left or right, and placement of dreaded chest prints. The standard print size for full front is 12"w x 14"h. This is where some mistakes are made. Below is a helpful guide that takes the eyeballing out of design placement. Be sure the bottom hem is aligned too. The easiest and fastest way to find the center of a shirt is to fold the shirt lengthwise lining up the shoulder seams at the neck. If the print is placed too close under the arm while on the press, once the shirt is put on, it becomes an armpit print instead of a left chest!
Eyeballing is an ok way to do it, but a more efficient way is to measure. Adjust your placement by approximately ½ for each size up from your smallest shirt. This is where some mistakes are made. Except that there is no buttons or placket to be able to determine how far down the logo should go. Be careful not to let the logo get too far to the left (as if wearing the shirt) as it may end up in the armpit area.
Welcome to trade.4over.com from trade.4over.com Sep 29, 2016 · in doubt on your placement, err on the side of centering the graphic toward the buttons. Eyeballing is an ok way to do it, but a more efficient way is to measure. Oct 26, 2017 · not too high, not too low, not too far left or right, and placement of dreaded chest prints. If the print is placed too close under the arm while on the press, once the shirt is put on, it becomes an armpit print instead of a left chest! The easiest and fastest way to find the center of a shirt is to fold the shirt lengthwise lining up the shoulder seams at the neck. The standard print size for full front is 12"w x 14"h. Below is a helpful guide that takes the eyeballing out of design placement. For example if the logo for a size small men's polo is 3.5 from the center point, the logo will
The easiest and fastest way to find the center of a shirt is to fold the shirt lengthwise lining up the shoulder seams at the neck.
Adjust your placement by approximately ½ for each size up from your smallest shirt. The standard print size for full front is 12"w x 14"h. Be careful not to let the logo get too far to the left (as if wearing the shirt) as it may end up in the armpit area. Sep 29, 2016 · in doubt on your placement, err on the side of centering the graphic toward the buttons. I found the placement of logo in the slide is not that easy. If the print is placed too close under the arm while on the press, once the shirt is put on, it becomes an armpit print instead of a left chest! Instead of placing the logo in the same position throughout the slides, i want to place the logo in the middle or a bit up from the middle in the title slide. In the slides after the titleslide i want to have the logo in the top right corner. For some designs, this size can look very large, and you can end up with a lot of ink on the shirt, which can result in a heavy print that isn't breathable, also known as a "sweat patch", for obvious reasons. Once the shirt is put on, there will be less area on the front of the shirt with part of it wrapping around to the person's side. There is not a standard size for a tag print and will be sized based on the design and how it relates to the shirt. For example if the logo for a size small men's polo is 3.5 from the center point, the logo will Except that there is no buttons or placket to be able to determine how far down the logo should go.
If the print is placed too close under the arm while on the press, once the shirt is put on, it becomes an armpit print instead of a left chest! logo placement on shirt. Be sure the bottom hem is aligned too.